Friday, April 20, 2012

Update to Switchback with Revit 2013

I’ve posted a couple times now about the Switchback feature in Navisworks and how it works with Revit.  Well, there is an update to the functionality for the 2013 release in a good way!

When you now use Switchback with Revit 2013, the camera view that you are using in Navisworks 2013 is now created in Revit…literally.  When in Revit, you’ll be directed to a new 3D View called “Navisworks”.  The nice thing is you don’t have to create this view, it happens automatically.  So if you rename or remove the “Navisworks” 3D View and use Switchback again, you’re going to get another “Navisworks” 3D View in Revit.  This is much, much better that what we got in 2012 where the camera didn’t change much in Revit, or maybe just went to a plan view.

Another change is that the object that you’ve selected in Navisworks 2013 to run Switchback with will now actually be selected in Revit 2013 and show the Properties!  Revit 2012 almost had it, but you had to do a few things to make the properties actually show even though the object was “selected”.

One thing though with the object selection potion of this…your results are going to vary depending on what you have your “Selection Resolution” set to.  When I first tried it, I had the “Selection Resolution” set to “Last Object” and the object selection in Revit wasn’t showing.  So I went back and tried the other options for “Selection Resolution” and the one that you want to use is “First Object”.  By using this “Resolution”, the Revit object will be highlighted and the properties of the object will be available.

Here’s a little video showing the new functionality of the Switchback feature for the 2013 products…

Navisworks and Revit 2013 Switchback

One thing to note for those using Revit 2012 and Navisworks 2013…you have the ability to use Navisworks Switchback 2013 in Revit 2012, but the functionality of the Switchback will be the 2012 functionality.

Thursday, April 19, 2012

Navisworks 2013 Selection Tree Changes-Similarities

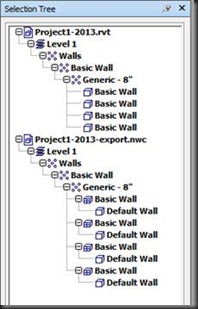
With the ability to now read Revit files, another change with Revit files is how they are organized in the Navisworks Selection Tree.  In the screen shot below, I’ve laid out some examples to illustrate the differences from 2012 Revit based NWC files (2012 and 2013 NWC), Revit 2013 NWC and Revit RVT files…

image

As you can see, Revit 2012 will export to a 2013 NWC file, but the organization stays the same as if it was exported to a 2012 NWC file.  So the new organization (of Level->Family Category->Family Type->Instance) is only going to show up when a RVT file is read directly into Navisworks, or you generate a NWC file from Revit 2013.

One thing to note with the above image, it doesn’t show an Append 2012 RVT file (oops).  I can say that it will show just like a Revit 2013 RVT file as shown below…

image

UPDATE:

Based on a comment I received, I didn’t notice the 2013 RVT and NWC files were named the same.  Since I didn’t refresh the NWF, it probably didn’t matter.  But to be safe, I re-appended the files with different names and the RVT and NWC show the same “structure” of Level, Category, etc. I did however notice that the exported NWC breaks down the Instances a step further than the RVT. Here’s the screen shot…

clip_image002

I didn’t look that closely at the tree before to notice this difference with 2013 Exported NWC’s and RVT’s. The NWC Export Settings and Revit File Reader options are the same, so this is something I want to look into further…

Revit File Reader Options

As I’m sure everyone is aware, Navisworks 2013 can read a Revit file natively.  While this is a nice new feature, I have one “compliant” I would like to file…

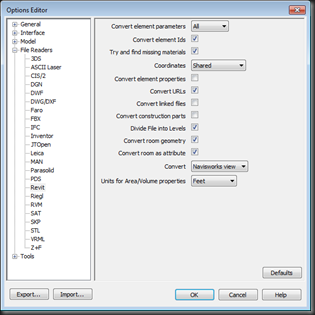
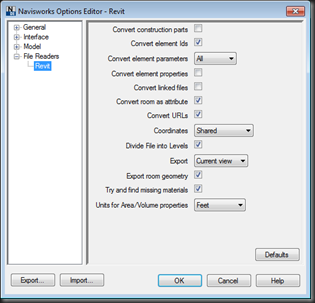
Why are the Options different when looking at the Export Options from Revit vs. the File Reader Options in Navisworks?  They aren’t totally different and quite honestly it doesn’t matter since everything is present, but why aren’t the laid out the same??

Here’s the Navisworks 2013 Revit File Reader Options…

SNAGHTML58cd10

And here’s the Revit NWC Exporter Options…

SNAGHTML5953bc

Again, is this a big deal…no.  But, it’s just something caught my eye and to me doesn’t make sense since Navisworks didn’t have the options in the first place.

Oh, and one other thing…you can’t Import/Export the Options from Revit to Navisworks and vice-versa.  The Import only works within the same Options dialog/platform.

Friday, April 13, 2012

No More Symbol in NWC File Names for 2013

Back in 2012, Navisworks introduced the # symbol in the name of the Navisworks generated NWC files to help differentiate between NWC created via an export. (see this post)

Well, it looks like that has changed in 2013 and has gone back to the pre-2012 way of doing things.  I was Appending in a Revit 2013 file and checked the generated NWC file…no # symbol.  So I did the same thing with a DWG, and again, no # symbol in the NWC name.  It’s very interesting that the addition of the # symbol only lasted a year.

Hopefully I can get some clarification on why this change was made and will report back with what I find.  Thanks Lee from Beyond Design for commenting on why the # symbol was removed and a little clarification on why it was introduced in the first place.

Wednesday, April 4, 2012

Navisworks 2013

Wow, the first part of 2012 has been a busy one!  As you are all probably already aware, the Autodesk 2013 products were introduced on March 27.  Instead of relisting the New Features for 2013, I’ll point you to Paul and Lee over at Beyond Design.  They have a nice list of the new features as well as a couple new posts about some of the features, like Grids and Levels!

As I get some more face time with Navis 2013, I’ll be posting about some of the new features that have been presented and ones that maybe weren’t as “advertised”.